I have not been too well again, I think I must have overdone it packing the Uganda suitcases. In the end 4 suitcases went out and I could not carry stuff for weeks. Had to get my son to carry all the food shopping. Though I know it will all be greatly appreciated and needed where the suitcases are going. Hopefully the person will remember to take photos.
Some of the items in the uganda suitcases:
Shoe box of stationary items like pencils, rubbers, rulers, colouring pens
Shoe box for teachers stationary like solar calculators, staplers, bulldog clips, laminated number squares
Shoe box of palette paints including watercolours and for small children
Shoe box of medical stuff like baby weight/height wheel, bandages,
Shoe box of cracker type toys including mini jigsaws, yoyos, crayons, football cards, stickers
Shoe box of 100 brooches (as in previous post)
Shoe box of christian stuff (as it was going with a missionary)
Bag of 12 bookmark kits for the children to practice handwriting
Three school sewing kits filled to the brim to help children practice sewing
Painting pads/books to go with the paints
A4 plastic sleeves for the teachers to keep important documents in
Some long skirts and mens clothes
The list carries on - but you get the picture that quite a lot of different stuff goes out - not just crafts and not just clothes. I've packed so hopefully someone will find their item invaluable.
This weekend I'm selling at a small local church craft fayre to raise funds to be able to send more stuff out and to give to the Ugandan people at the point of need. Hopefully I will blog afterwards and let people know how much was raised.
Thursday, 9 February 2012


Tuesday, 17 January 2012
Swap - bot blog post
On swap-bot I recently joined a swap where you write a blog post for that person. The person I wrote for has a blog on spirituality. In a few days you can find my post at http://www.buddhatropolis.com
Hopefully soon I will be able to put a post up from the person who had me as a swap partner.
Hopefully soon I will be able to put a post up from the person who had me as a swap partner.
Monday, 16 January 2012
Recycling those christmas cards for sellers
Unfortunately I have not been too well and have not been able to blog recently. Hopefully Im not too late and there are still those christmas cards swirling around.
If you sell at craft fayres or shops, they will come in really handy as your packaging. I have been using the small square ones that are around 10cm x 10cms - but you could use whichever ones you want.
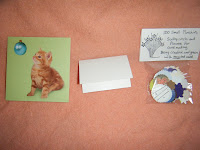 Take off the back of the card.
Fold so that the image is on the inside and you have blank white card on the outside.
Print your logo or however you put your description.
Staple it onto your bag.
Please note - this does not work with cards that have writing on the back of the picture or those that have a lot of glitter, as they are really hard to fold.
Would be really interested to know how many sellers will use this as part of their recycling scheme.
If you sell at craft fayres or shops, they will come in really handy as your packaging. I have been using the small square ones that are around 10cm x 10cms - but you could use whichever ones you want.
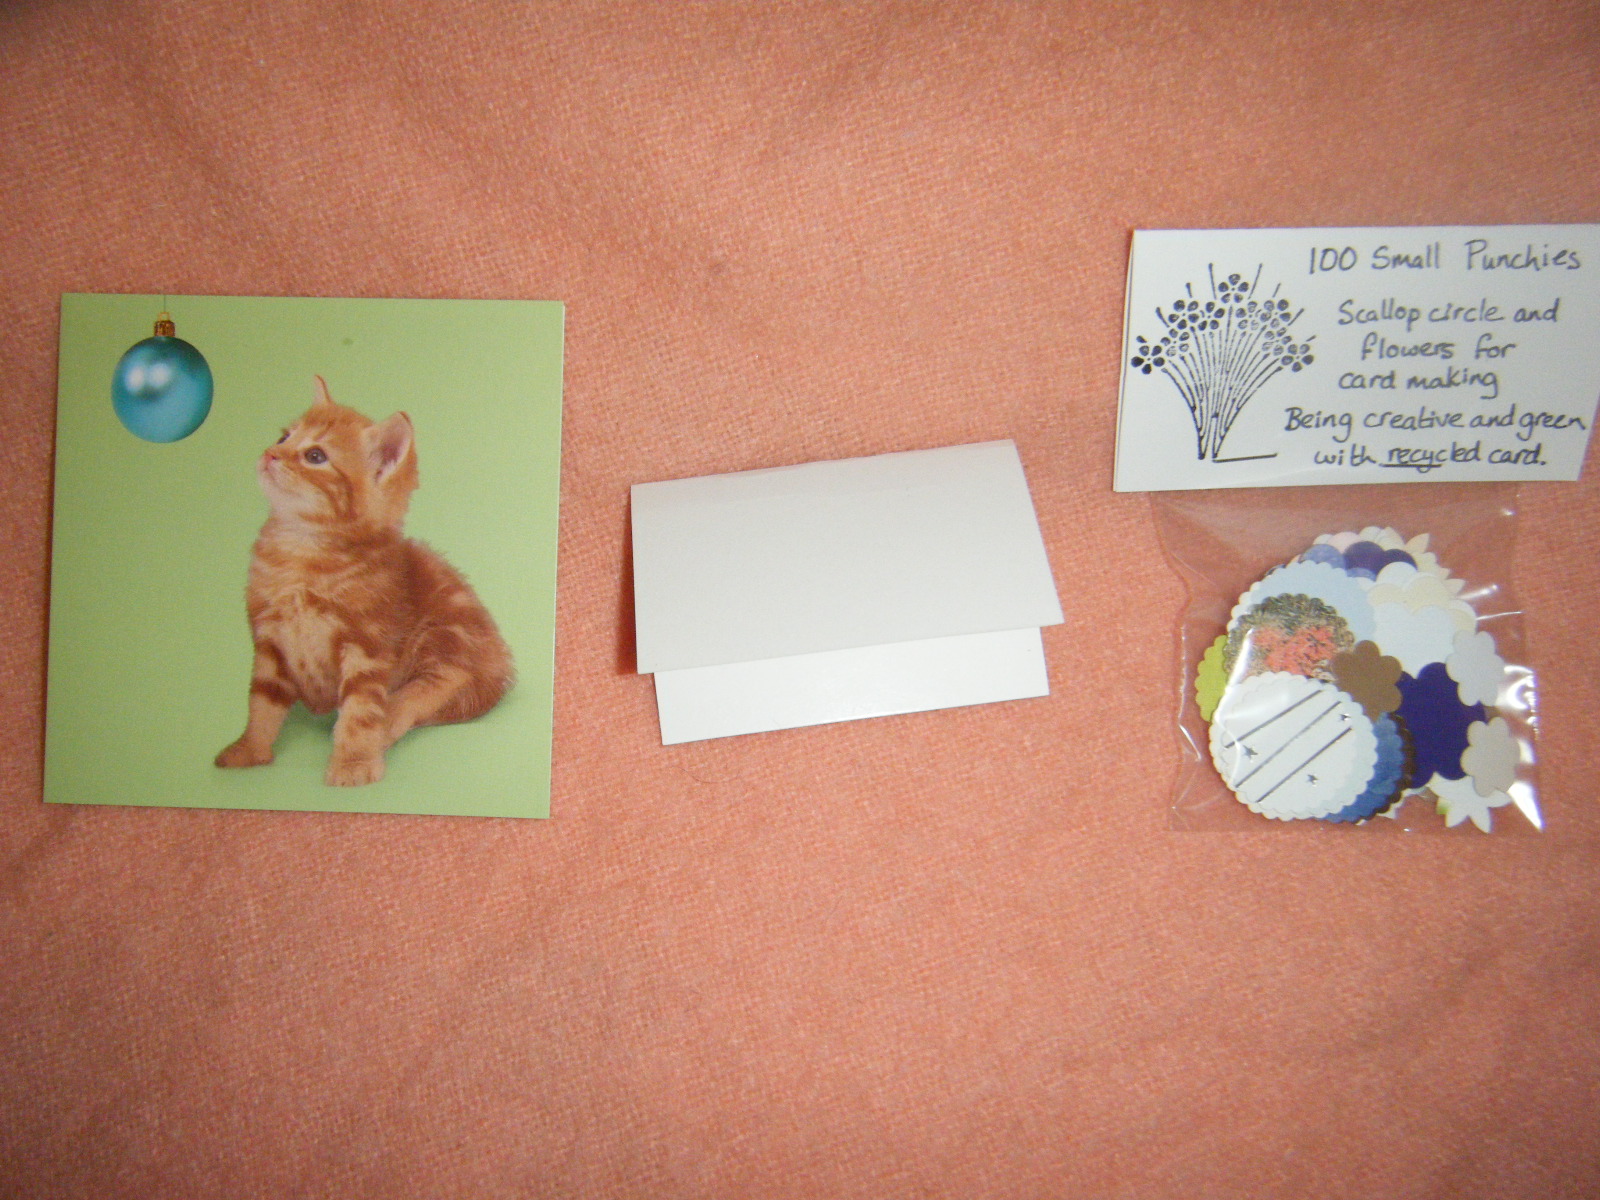
Fold so that the image is on the inside and you have blank white card on the outside.
Print your logo or however you put your description.
Staple it onto your bag.
Please note - this does not work with cards that have writing on the back of the picture or those that have a lot of glitter, as they are really hard to fold.
Would be really interested to know how many sellers will use this as part of their recycling scheme.
Saturday, 17 December 2011
Recycling supermarket net bags
I am a stickler for keeping things that I feel can be recycled through crafting, even though I may not know at the time what to use it for.
Anyway over the past year I have been keeping those horrible plasticky net grocery bags in a glass jar. You know the ones the onions and clementines come in. Well today - it came to me.
I have recently been destashing my ribbon odds and making them into bows and love knots ready for crafting. When I saw the net bag when eating a clementine I thought about bows instantly.
Cut off any metal tags or plastic writing - it is just the netting you need. Then tie a bow. That simple!

If the netting is really roughed up (see the green bow) it looks like raffia. But others are quite neat.
Different colours can go for different seasons ie orange halloween, red and green christmas.

Or you could make them into angel/fairy wings by pulling the ends into the bow bit and securing with a couple of stitches or a dab of glue. Then open up the netting. Picture is an example of a white net bag put as angel wings on one of my dotee dolls.
Hope you have some fun with those pesky bags, would love to see your interpretations.
Anyway over the past year I have been keeping those horrible plasticky net grocery bags in a glass jar. You know the ones the onions and clementines come in. Well today - it came to me.
I have recently been destashing my ribbon odds and making them into bows and love knots ready for crafting. When I saw the net bag when eating a clementine I thought about bows instantly.
Cut off any metal tags or plastic writing - it is just the netting you need. Then tie a bow. That simple!

If the netting is really roughed up (see the green bow) it looks like raffia. But others are quite neat.
Different colours can go for different seasons ie orange halloween, red and green christmas.

Or you could make them into angel/fairy wings by pulling the ends into the bow bit and securing with a couple of stitches or a dab of glue. Then open up the netting. Picture is an example of a white net bag put as angel wings on one of my dotee dolls.
Hope you have some fun with those pesky bags, would love to see your interpretations.
Felting blankets
In my recycling mind I find it hard to cut something up to upcycle it when it has a good use as it is. Therefore it is usually only a few clothes that get cut up, the rest are sent to Uganda.
So even knowing that I could easily felt blankets for my sizzixing, I personally feel cutting up a single or bigger blanket for crafting is a waste, as it could help a homeless person in England much more then cutting it up for flower making.
So when I came accross a few blankets that had holes in them in the local charity shop I snatched them up as they were going dirt cheap. There were two I really liked: a lime green and a pink one.
I got them home, stuck them into the washing machine on a 90 degree cotton wash to felt them. The lime green one felted really well. The pink one needs another wash.
All I need now is for the charity shops to have unusable blankets in other colours like purple and yellow. That would make my christmas!
So even knowing that I could easily felt blankets for my sizzixing, I personally feel cutting up a single or bigger blanket for crafting is a waste, as it could help a homeless person in England much more then cutting it up for flower making.
So when I came accross a few blankets that had holes in them in the local charity shop I snatched them up as they were going dirt cheap. There were two I really liked: a lime green and a pink one.
I got them home, stuck them into the washing machine on a 90 degree cotton wash to felt them. The lime green one felted really well. The pink one needs another wash.
All I need now is for the charity shops to have unusable blankets in other colours like purple and yellow. That would make my christmas!
Monday, 12 December 2011
Recycling greeting cards for Uganda
In order to make quite a few craft kits for the children in orphanages and schools, I rely heavily on recycling greetings cards. I have to consider the weight and ultimately whether it is an easy craft that children will keep.
The person that goes out there visits around 20 schools/orphanages as well as churches and destitute homes. So trying to keep the weight down to be able to give to more people is essential.
When sorting the cards for the Uganda project I put them into several piles:
Tag making
 These are scenery pictures, flowers or backgrounds that look nice at 5cm to 5.5cms wide. I round the corners and make one hole punch. The kits are then put together once I have 50 tag bases. The kit is simple, thinking of the weight: the 50 tags and 3 different types of coloured wool as well as a sample. I put basic instructions showing it as a handwriting exercise for the childs favourite quote or parable. The instruction label is on the bag, so when given to a teacher they can quickly see what the package is for. None of the scenes show window shops or dressed christmas trees or santa pictures.

Nativity/Bible pictures
As the suitcases are going out with the missionaries, I collect all the nativity and bible pictures and seperate them into sections. Nativity, Jesus, Church and crosses, bible scenes, Mary, angels. I then cut down the cards to take out any writing that may indicate Easter or Christmas. These can then be handed out at the churches they attend.
Minature jigsaws
I recently bought a cuttlebug 9 piece jigsaw die to be used on the greetings cards. The design for these cards are usually what I cant use for the tags because the picture is too big ie animals. It is also good for changing unwanted photos into something useful. They are put into small bags with a small sticker indicating what type of picture it is ie dog. These are to be given out to individual children in their family setting like a cracker toy. I am still trying to find a quote to make it a meaningful present - something along the line of : Not trying your best means the world has something missing.This would link in with if a jigsaw has a missing piece etc. If anyone has come accross such a quote please put it in the comment section.
 Bobbins
Any cards that dont make the above, but are thick card - makes the bobbin pile. I get my square punch to them and then curve 2 sides with scissors - it does not matter the picture (as long as its not rude!). I then put it into my embroidery box ready for when I make up the sewing kits. I'm still hoping to find a smaller square punch that is not too expensive, as my square punch is the big lever pink woodware one - but it still does the job of uniformed sizing. Photo shows bought bobbin compared to my recycled bobbin.

Colouring in bookmarks
I also recycle the backs of the cards. Any cream or white backs, where there is no writing I cut out ready for stamping. Like the bible pictures, these are going with the missionaries. So I have stamped them with religious images. I use permanent black ink so that the image is well defined. These are put into kits of 50 bookmarks with a small set of colouring pencils.
Scraps
Any scraps from the above are then put into my punchies bag. I have quite a lot of different punches, most are the lever type as I find them easiest. I then get my bag out every now and then and have an hour just punching shapes out. These are then put into a craft kit for gluing and sticking. The kit would include some background card, then a whole lot of bagged punched shapes and a glue stick. It would also include a sample bookmark.
Whatever can't be used for the Uganda projects are used in different ways in my crafting.
The person that goes out there visits around 20 schools/orphanages as well as churches and destitute homes. So trying to keep the weight down to be able to give to more people is essential.
When sorting the cards for the Uganda project I put them into several piles:
Tag making
 These are scenery pictures, flowers or backgrounds that look nice at 5cm to 5.5cms wide. I round the corners and make one hole punch. The kits are then put together once I have 50 tag bases. The kit is simple, thinking of the weight: the 50 tags and 3 different types of coloured wool as well as a sample. I put basic instructions showing it as a handwriting exercise for the childs favourite quote or parable. The instruction label is on the bag, so when given to a teacher they can quickly see what the package is for. None of the scenes show window shops or dressed christmas trees or santa pictures.
Nativity/Bible pictures
As the suitcases are going out with the missionaries, I collect all the nativity and bible pictures and seperate them into sections. Nativity, Jesus, Church and crosses, bible scenes, Mary, angels. I then cut down the cards to take out any writing that may indicate Easter or Christmas. These can then be handed out at the churches they attend.
Minature jigsaws
I recently bought a cuttlebug 9 piece jigsaw die to be used on the greetings cards. The design for these cards are usually what I cant use for the tags because the picture is too big ie animals. It is also good for changing unwanted photos into something useful. They are put into small bags with a small sticker indicating what type of picture it is ie dog. These are to be given out to individual children in their family setting like a cracker toy. I am still trying to find a quote to make it a meaningful present - something along the line of : Not trying your best means the world has something missing.This would link in with if a jigsaw has a missing piece etc. If anyone has come accross such a quote please put it in the comment section.

Any cards that dont make the above, but are thick card - makes the bobbin pile. I get my square punch to them and then curve 2 sides with scissors - it does not matter the picture (as long as its not rude!). I then put it into my embroidery box ready for when I make up the sewing kits. I'm still hoping to find a smaller square punch that is not too expensive, as my square punch is the big lever pink woodware one - but it still does the job of uniformed sizing. Photo shows bought bobbin compared to my recycled bobbin.

Colouring in bookmarks
I also recycle the backs of the cards. Any cream or white backs, where there is no writing I cut out ready for stamping. Like the bible pictures, these are going with the missionaries. So I have stamped them with religious images. I use permanent black ink so that the image is well defined. These are put into kits of 50 bookmarks with a small set of colouring pencils.
Scraps
Any scraps from the above are then put into my punchies bag. I have quite a lot of different punches, most are the lever type as I find them easiest. I then get my bag out every now and then and have an hour just punching shapes out. These are then put into a craft kit for gluing and sticking. The kit would include some background card, then a whole lot of bagged punched shapes and a glue stick. It would also include a sample bookmark.
Whatever can't be used for the Uganda projects are used in different ways in my crafting.
Sunday, 11 December 2011
Flower brooches for Uganda
I have been making so many flower brooches - they feel as if they are in my dreams too. Two days ago I had enough of brooch making and decided I would do something else.

 Today while packing away the flower brooches I made for this years trip, the total number came to .....98. Then I have 2 bow brooches. So in total 100 brooches are going out to Uganda to give to people who have torn clothes. I have been told that the Ugandan people love their bright colours.
 I would like to publicly thank a few people who have helped me with them over the past few months.
- My son's girlfriend who matched up some of the flowers when I got stuck.
- My crafting friend for helping to sew on the buttons and the brooch backs.
- People on freecycle who have encouraged me by their comments
 All of the brooches are mainly made from recycled material .
The wool I have picked up from different charity shops, usually the small pieces that are around 50p a bag. The buttons were from freecyclers and charity shops. The silky type flowers were mainly from artificial flowers my mother gave me to recycle. The material ones comes from hair scrunchies and scrap materials people from freecycle gave me.
 I did purchase some thick felt flowers, some crochet flowers and the brooch backs. Also from my craft stash which are not recycled were some flower embellishments.
When making them there were certainly some favourites like the purply velvet one with gold beads and buttons in this picture. Also the yellow scrap material rose in this picture turned out very beautiful.
Sorry about the poor quality photos, the sunshine decided not to appear today - but it is nearly the middle of December and we have been very lucky with the weather in South East England.

 Today while packing away the flower brooches I made for this years trip, the total number came to .....98. Then I have 2 bow brooches. So in total 100 brooches are going out to Uganda to give to people who have torn clothes. I have been told that the Ugandan people love their bright colours.
- My son's girlfriend who matched up some of the flowers when I got stuck.
- My crafting friend for helping to sew on the buttons and the brooch backs.
- People on freecycle who have encouraged me by their comments

The wool I have picked up from different charity shops, usually the small pieces that are around 50p a bag. The buttons were from freecyclers and charity shops. The silky type flowers were mainly from artificial flowers my mother gave me to recycle. The material ones comes from hair scrunchies and scrap materials people from freecycle gave me.

When making them there were certainly some favourites like the purply velvet one with gold beads and buttons in this picture. Also the yellow scrap material rose in this picture turned out very beautiful.
Sorry about the poor quality photos, the sunshine decided not to appear today - but it is nearly the middle of December and we have been very lucky with the weather in South East England.
This month
Wow - has it nearly been a whole month since I last posted. In between being ill and trying to catch up the weeks have flown by - though I have managed a few things.
My son and his girlfriend put up the christmas tree, used everything from last year though I still want to make a couple of decorations, hopefully I will get the time.
Attended a couple of social crafting sessions, took my Uganda brooches along to finish off. Met a couple of people who do their own spinning, in awe of them, must take a lot of strength and patience.
Helped out with a few hours at the local charity christmas card event - where they sell cards etc for different charities. This is done all around England.
My friend who helps with the Uganda project had her own craft stall yesterday, so kept her company most of the time.
Will take photos of my Uganda project stuff today when daylight comes and will update whats been completed with some photos.
My son and his girlfriend put up the christmas tree, used everything from last year though I still want to make a couple of decorations, hopefully I will get the time.
Attended a couple of social crafting sessions, took my Uganda brooches along to finish off. Met a couple of people who do their own spinning, in awe of them, must take a lot of strength and patience.
Helped out with a few hours at the local charity christmas card event - where they sell cards etc for different charities. This is done all around England.
My friend who helps with the Uganda project had her own craft stall yesterday, so kept her company most of the time.
Will take photos of my Uganda project stuff today when daylight comes and will update whats been completed with some photos.
Wednesday, 16 November 2011
Uganda project
I am so busy sorting out the Uganda suitcases. I have a date for end of January for the suitcases to be picked up ready for taking out. Though I dont want it hanging over Christmas, so trying to sort it out now.
I am so pleased that people from freecycle have helped by giving stuff when they have clear outs.
At the moment I have packed one suitcase, filled with all sorts of school resources - these include folders, protective paper sleeves, staplers, solar calculators, colouring pens, pencils, block paints, the list goes on.
I am still making up the craft packs which will go in the second suitcase along with some ankle length skirts.
I have a long list of things to get done, it seems a bit overwhelming. Trying to take it a bit at a time as my health has not been too good recently.
I am hoping to photograph some of the packs before they go, and will hopefully post them here.
I am so pleased that people from freecycle have helped by giving stuff when they have clear outs.
At the moment I have packed one suitcase, filled with all sorts of school resources - these include folders, protective paper sleeves, staplers, solar calculators, colouring pens, pencils, block paints, the list goes on.
I am still making up the craft packs which will go in the second suitcase along with some ankle length skirts.
I have a long list of things to get done, it seems a bit overwhelming. Trying to take it a bit at a time as my health has not been too good recently.
I am hoping to photograph some of the packs before they go, and will hopefully post them here.
Sunday, 6 November 2011
Milk Jug Decorative Window Crafts | Alphamom
Milk Jug Decorative Window Crafts | Alphamom
Wow - these butterflies from milk bottles are brilliant, hopefully get round this week to try some and take photos.
Wow - these butterflies from milk bottles are brilliant, hopefully get round this week to try some and take photos.
Friday, 4 November 2011
Tuesday, 1 November 2011
Cute christmas ornaments
This will definately fit in with my handmade recycled christmas decor. I intend to make these with either used wrapping paper or if thats not thick enough used greetings cards. I will post once Ive made them.
Celebrate Life: 12 Days of Christmas: Day 11
Celebrate Life: 12 Days of Christmas: Day 11
Sunday, 30 October 2011
Button cufflinks, fantastic!!
These are fantastic for button lovers. You must go and see them and maybe make some.
Make cufflinks for any occasion | The Craft Blog
Make cufflinks for any occasion | The Craft Blog
Make a quick ‘n’ easy Halloween bunting | The Craft Blog
Quick and easy addition to halloween treat bags for the younger kids.
Make a quick ‘n’ easy Halloween bunting | The Craft Blog
Instead of making it with long strips of crepe.
Fold A4 paper so that you have halloween strips. You get a few strips out of it.
Orange for pumpkins, white for ghosts or mummies, green for frankensteins etc
Cut out main shape and leave the faces for the children to draw on.
Love to see your designs.
Make a quick ‘n’ easy Halloween bunting | The Craft Blog
Instead of making it with long strips of crepe.
Fold A4 paper so that you have halloween strips. You get a few strips out of it.
Orange for pumpkins, white for ghosts or mummies, green for frankensteins etc
Cut out main shape and leave the faces for the children to draw on.
Love to see your designs.
Saturday, 22 October 2011
How to make Christmas decorations out of old Christmas cards | Make it and Mend it
How to make Christmas decorations out of old Christmas cards | Make it and Mend it
Some more ways of using up old greetings cards
Some more ways of using up old greetings cards
How to make junk mail stars | Make it and Mend it
How to make junk mail stars | Make it and Mend it
Came across this and thought it would fit in nicely to my recycled handmade christmas theme.
Came across this and thought it would fit in nicely to my recycled handmade christmas theme.
Thursday, 20 October 2011
Doodling flowers
I dont draw - I doodle.
Its much easier then getting frustrated in trying to get everything exact.
Here are some simple step by step pictures for doodling flowers. They get quite addictive. They are great for zentangling.
Pointed flower doodle
 It was my son's girlfriend birthday - he wrapped the present and I doodled on the wrapping.
 Step 1: Make a large dot
Step 2: Zigzag around the dot
Step 3: Do a larger zigzag that complements the previous zigzag.
Step 4 - 6: Repeat step 3
Step 7 : Put pointed petals in spaces
Step 8: Doodle curvy lines
Raindrop flower

Step 1 : Make sure you can draw a raindrop
Step 2: Draw raindrops into a circle (it does not matter how many raindrops)
Step 3: Draw a circle in the centre of the raindrops. Draw background petals.
Step 4: Put lines at the centre of each petal
Step 5: Finish it off with stalk and leaves.
Alternative step 5: Put "Green Man's" face or fairy face or use as a sun.
Pansy doodle
 You need two complementing colours
Step 1: Make a large round dot
Step 2: Do about 5 squiggly petals around the dot
Step 3: Put 3 squiggly lines in the centre of each petal
Step 4: Using different coloured pen, draw on the inside if using lighter colour, or draw on outside if using darker colour. Outline all the petals.
Step 5: Add petals in the spaces between the petals, making sure to add the squiggly lines and the outline.
Step 6: Continue adding petals until you are satisfied with the shape.
Hope you have enjoyed this - would love to see how people have interpreted it into their artwork/zentagling.
Its much easier then getting frustrated in trying to get everything exact.
Here are some simple step by step pictures for doodling flowers. They get quite addictive. They are great for zentangling.
Pointed flower doodle


Step 2: Zigzag around the dot
Step 3: Do a larger zigzag that complements the previous zigzag.
Step 4 - 6: Repeat step 3
Step 7 : Put pointed petals in spaces
Step 8: Doodle curvy lines
 |
| Doodled in two colours |
Raindrop flower

Step 1 : Make sure you can draw a raindrop
Step 2: Draw raindrops into a circle (it does not matter how many raindrops)
Step 3: Draw a circle in the centre of the raindrops. Draw background petals.
Step 4: Put lines at the centre of each petal
Step 5: Finish it off with stalk and leaves.
Alternative step 5: Put "Green Man's" face or fairy face or use as a sun.
Pansy doodle

Step 1: Make a large round dot
Step 2: Do about 5 squiggly petals around the dot
Step 3: Put 3 squiggly lines in the centre of each petal
Step 4: Using different coloured pen, draw on the inside if using lighter colour, or draw on outside if using darker colour. Outline all the petals.
Step 5: Add petals in the spaces between the petals, making sure to add the squiggly lines and the outline.
Step 6: Continue adding petals until you are satisfied with the shape.
Hope you have enjoyed this - would love to see how people have interpreted it into their artwork/zentagling.
Reusing squashed and crinkled curling ribbon
I get given a lot of curling ribbon from friends, family and freecycle. I dont really mind in what state it comes as it is a great resource. I don't believe in buying it as it is not a "green" packaging option - but reusing it is the perfect option for me.
One use is for threading buttons into sets instead of using wool. I always find the wool catches and does not thread through the button hole easily. With the curling ribbon, you cut it in half with a point on the end and then it will go in almost any button hole so easily.
Though I mainly use it as curling ribbon packaging. Why do I like it so much - because it can be reused many times over.
One use is for threading buttons into sets instead of using wool. I always find the wool catches and does not thread through the button hole easily. With the curling ribbon, you cut it in half with a point on the end and then it will go in almost any button hole so easily.
Though I mainly use it as curling ribbon packaging. Why do I like it so much - because it can be reused many times over.
 |
| A crinkled old large bow made from curling ribbon |
 |
| Cut the bow up into strips and start curling with scissors. Half way there! |
 | ||
| Finished product with no sign of what it used to be like. |
 |
| An old battered gift bow |
 |
| Cut the pieces and curl to get a new look! |
 |
| Another crinkled bow. Cut into strips and curl. |
 |
| Voila!! |
Tuesday, 18 October 2011
Tutorial for gift boxes from greetings cards
I have been asked for a template for the gift boxes, but as greeting cards come in all different sizes, there is not a template which will cover them all. So a tutorial is the next best thing. It is best to try it with an A5 card or similar first, as a trial run and then go for smaller cards once you have worked out the technique and measurements.
 1. Find two greeting cards that are of similar size and the pictures will look good together. ie 2 red christmas cards.
2. Cut both of them to the exactly same size. This is very important - otherwise it will not sit properly as a box.
Decide which is top and which is bottom.
 3. For the top of the box, measure 15mms from the edge on all four sides and score.
4. On the corners, the scoring should make a box. Cut it diagonally from the corner to the scored meeting point. Fold all scored lines.
 5. On each of the corners. On one bit cut up from the centre half way to create a folded small triangle.
Cut the other scored line half way down as seen in photo. This is to make an interlocking corner.
 6. Fold the slitted triangle into the half slit from the top to make an interlocking corner for the box. ( Sorry not very good at explanations - if anyone can describe this better - your welcome to use the comments section)
7. Do this for all four corners to make the box top.
8. For the bottom of the box do steps 3 to 7, but make the measurement 1mm smaller.
 9. You may want to sellotape or glue the corners, but it is not necessary.
These 15mms measurement can be changed according to whether you want a deeper or shallower box. The size of the card can change as well. The only measurement that needs to remain the same is the 1mm difference between the top and bottom box.
This recycling idea does not work well with greeting cards that have extra 3D embellishments already on them.
 Ideas to make the box special:
You may want to put a serviette / tissue paper in to not let your gift slide around.
You may want to wrap ribbon or the like with a bow at the top.
Add embellishments or name tags or write a poem in a coloured pen.

I hope this tutorial gets people to reuse their greetings cards. I would love to see some of the gift boxes that people have made from their greetings cards.
 1. Find two greeting cards that are of similar size and the pictures will look good together. ie 2 red christmas cards.
2. Cut both of them to the exactly same size. This is very important - otherwise it will not sit properly as a box.
Decide which is top and which is bottom.
 3. For the top of the box, measure 15mms from the edge on all four sides and score.
4. On the corners, the scoring should make a box. Cut it diagonally from the corner to the scored meeting point. Fold all scored lines.

Cut the other scored line half way down as seen in photo. This is to make an interlocking corner.

7. Do this for all four corners to make the box top.
8. For the bottom of the box do steps 3 to 7, but make the measurement 1mm smaller.
 9. You may want to sellotape or glue the corners, but it is not necessary.
These 15mms measurement can be changed according to whether you want a deeper or shallower box. The size of the card can change as well. The only measurement that needs to remain the same is the 1mm difference between the top and bottom box.
This recycling idea does not work well with greeting cards that have extra 3D embellishments already on them.
 Ideas to make the box special:
You may want to put a serviette / tissue paper in to not let your gift slide around.
You may want to wrap ribbon or the like with a bow at the top.
Add embellishments or name tags or write a poem in a coloured pen.

I hope this tutorial gets people to reuse their greetings cards. I would love to see some of the gift boxes that people have made from their greetings cards.
Sunday, 16 October 2011
Bookmark kits for Uganda
I have finally put the recycled greeting cards into two bookmark kits.
These will be good for two different childrens group, whether they are at an orphanage, school or church. I made up one tag and then selected 50 bookmarks and added the wool into the bag - so they can choose the funky fibres to go on their bookmarks.
 |
| Pack 1 of bookmark kit |
 |
| Pack 2 of bookmark kit |
Subscribe to:
Posts (Atom)